 Save
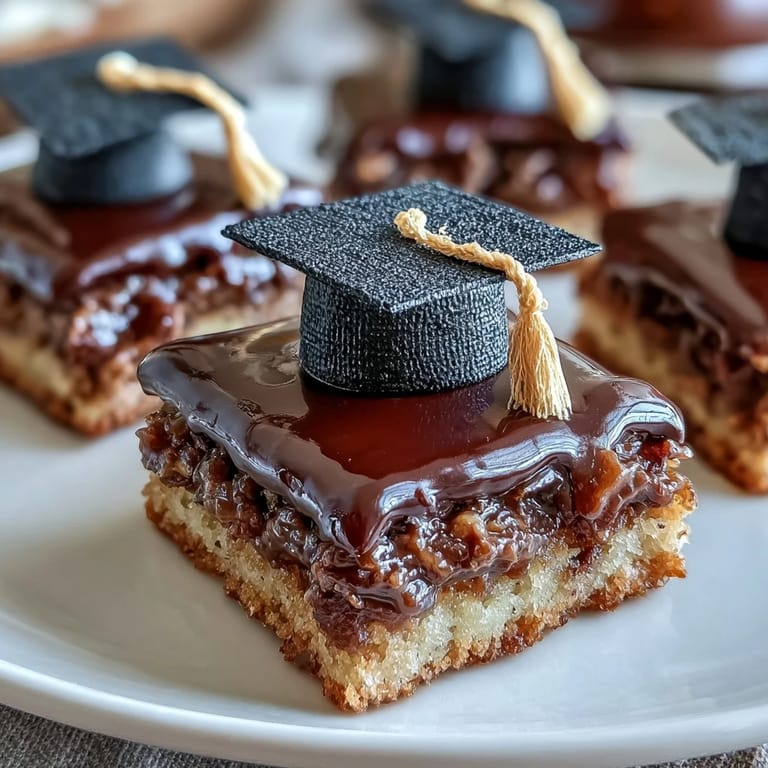
Save My sister called me three weeks before her daughter's graduation, panic in her voice—she needed something special for the celebration party but didn't have time for elaborate baking. I found myself standing in my kitchen that evening, thinking about how a simple sugar cookie could become something meaningful with just a touch of fondant creativity. These graduation cookies turned out to be exactly what she needed: impressive enough to impress the guests, simple enough that I could make two dozen without losing my mind, and genuinely delicious beneath all that festive decoration.
I'll never forget watching my nephew's face light up when he saw the whole platter of these cookies at his graduation party—he immediately grabbed three and started showing them to everyone like they were tiny edible trophies. That's when I realized these weren't just cookies; they were little celebrations you could hold in your hand, a way to say 'I'm proud of you' through butter and sugar and a fondant hat.
Ingredients
- All-purpose flour: The foundation of everything—make sure it's fresh because old flour can make your dough feel dense and disappointing.
- Baking powder: Just enough to give the cookies a tender crumb without making them cake-like, which would ruin the whole vibe.
- Unsalted butter: Room temperature is non-negotiable here; cold butter won't cream properly and you'll end up with dense cookies instead of tender ones.
- Granulated sugar: The sweetness that makes people close their eyes when they bite down, paired perfectly with the vanilla.
- Large egg: Brings everything together and adds structure; don't skip it or substitute unless you know what you're doing.
- Pure vanilla extract: The real stuff, not imitation—it makes a noticeable difference in flavor that people will taste and wonder about.
- Black fondant: Creates that instantly recognizable mortarboard shape; you can find it at cake decorating stores or order it online if your local shops don't carry it.
- Yellow fondant: The tiny tassel detail that transforms a hat into a graduation hat; it's worth the small extra cost.
- Cornstarch: Dust your work surface and rolling pin with this instead of flour to prevent sticking without drying out the fondant.
- Powdered sugar: Mixed with milk and vanilla, it becomes the edible glue that holds your decorations in place.
Tired of Takeout? 🥡
Get 10 meals you can make faster than delivery arrives. Seriously.
One email. No spam. Unsubscribe anytime.
Instructions
- Get your oven ready and gather your mise en place:
- Preheat to 350°F and line your baking sheets with parchment paper while you're thinking about it, so you're not scrambling later. This small act of organization saves you from the panic of pulling hot cookies with nowhere to put them.
- Mix the dry ingredients separately:
- Whisk flour, baking powder, and salt in a medium bowl, breaking up any tiny lumps. This ensures everything is evenly distributed so you don't get a surprise pocket of salt in one bite.
- Cream the butter and sugar until it's practically cloud-like:
- This should take about 2 to 3 minutes with an electric mixer—you'll see the mixture transform from dense and grainy to pale and fluffy. This step is where the magic happens; don't rush it.
- Beat in the egg and vanilla:
- Add them together and mix until you can't see streaks of egg anymore. The mixture might look slightly broken or curdled, but don't panic; it comes together once the flour goes in.
- Gently fold in the dry ingredients:
- Mix just until you don't see flour anymore—overmixing develops gluten and makes tough cookies nobody wants. Use a spatula and fold instead of aggressively mixing if you're worried.
- Roll and cut your cookies:
- On a lightly floured surface, roll the dough to about 1/4-inch thickness, then cut into 2 1/2-inch rounds or squares. The thickness matters because too thin means they'll bake too fast and crisp up before they can be tender.
- Bake until the edges are just barely golden:
- This takes 10 to 12 minutes depending on your oven's personality; pull them out when the very edges are golden but the centers still look slightly soft. They'll continue cooking on the hot pan after you remove them, so don't overbake.
- Cool completely on a wire rack:
- This is non-negotiable because warm cookies won't hold fondant decorations properly. If you try to decorate warm cookies, everything slides right off like you never tried.
- Prepare your fondant pieces while cookies cool:
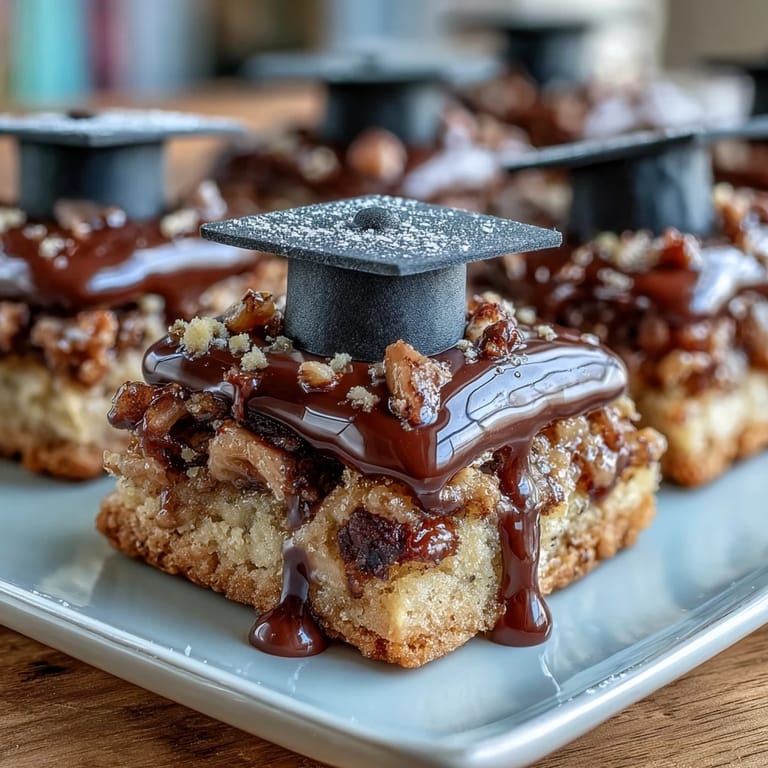
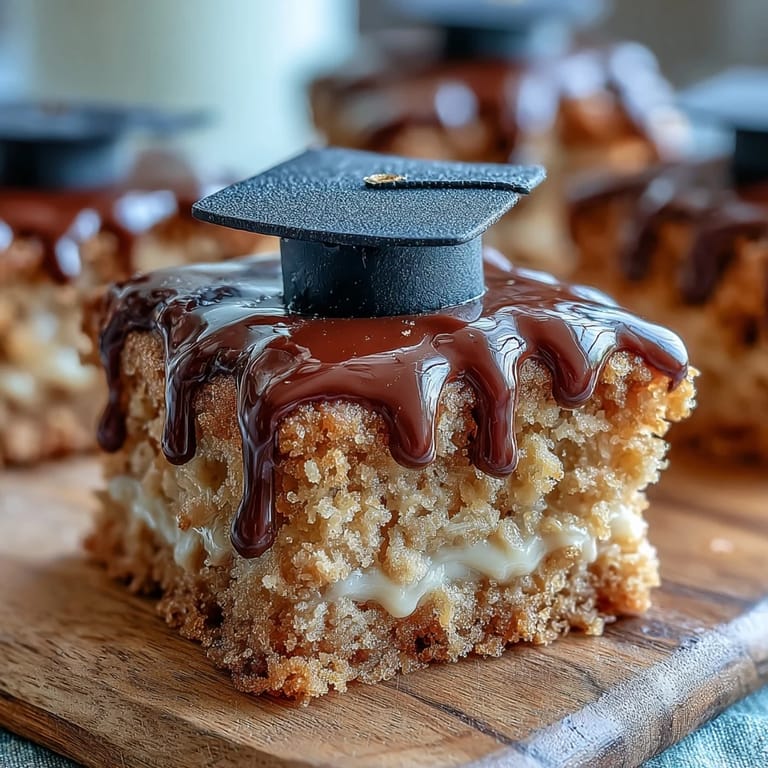
- Roll black fondant to 1/8-inch thickness and cut twenty-four small squares for the mortarboard tops. Roll twenty-four tiny cylinders for the base of each hat, and roll yellow fondant into thin ropes that you'll cut into 1-inch pieces for tassels.
- Make your royal icing:
- Mix powdered sugar with milk and vanilla until you reach a consistency that's smooth but pipeable—it should coat a spoon but not be runny. This is your edible glue, so getting it right matters.
- Assemble each cookie like you're decorating a tiny graduation cap:
- Use a small amount of icing to attach a black fondant square in the center of each cooled cookie, then nestle a fondant cylinder underneath as the base. Add a dab of icing to one corner of the square and press on a yellow tassel piece.
- Let everything set before you touch them:
- Give it at least 20 to 30 minutes so the icing dries and holds everything in place. If you try to package or transport them too early, you'll have fondant sliding everywhere.
 Save
Save There's something deeply satisfying about turning simple cookies into something that feels celebratory and specific, a small way of saying 'this moment matters' through a dessert. When someone bites into one of these and that fondant mortarboard comes off in their teeth with a little crunch, you'll know you nailed it.
Making Them Match School Colors
The beauty of fondant is that you can color it to match any school or team colors you're celebrating, making these cookies feel genuinely personal rather than generic. I once made a batch where the mortarboards were maroon and gold for a family's alma mater, and people kept asking if I'd somehow ordered them custom made. You can use gel food coloring to tint fondant before rolling it out, kneading the color in evenly until you get exactly the shade you want.
Storage and Make-Ahead Strategies
These cookies keep beautifully for up to five days in an airtight container, which means you can bake them a few days before the party and decorate them the day of, spreading out the work. I've found that decorating them day-of actually works better anyway because the fondant stays fresher-looking and the icing doesn't get old and crusty while you're waiting for the celebration. You can also bake the plain cookies up to a week ahead and freeze them, then thaw and decorate whenever you're ready.
Shortcuts and Clever Swaps
If you're genuinely short on time—and let's be honest, sometimes life gets overwhelming—you can absolutely use quality store-bought sugar cookie dough and pre-colored fondant without anyone knowing or caring. The decoration work is what makes these feel special and thoughtful, not necessarily the from-scratch baking, so don't stress if you need to take a shortcut. I've done it, and the cookies tasted great and looked impressive, which is really all that matters when you're celebrating someone's achievement.
- Pre-made fondant comes in colors already, so you skip the whole tinting step and go straight to rolling.
- Store-bought dough means you have more energy left for the creative decoration part, which honestly is where the fun lives.
- Nobody needs to know your secret unless you want to tell them, and most people will be too busy enjoying the cookies to ask anyway.
 Save
Save These cookies have a way of becoming the highlight of any graduation celebration, a small edible moment that people remember long after the party's over. Make them with confidence, knowing that you've created something both delicious and genuinely celebratory.
Recipe Questions
- → What type of flour is best for these cookies?
All-purpose flour provides the right structure and texture, ensuring a tender crumb that holds the fondant decorations well.
- → How do I prevent fondant from sticking?
Dust your workspace and rolling pin lightly with cornstarch to keep the fondant smooth and easy to handle while shaping the mortarboard pieces.
- → Can I prepare the decorations in advance?
Yes, fondant mortarboard pieces can be rolled and cut ahead of time, stored in an airtight container to keep fresh before assembling on the cookies.
- → What is the best way to attach fondant to the cookies?
Use a simple icing made from powdered sugar and milk as an edible glue to secure fondant shapes firmly onto the cookie surface.
- → How should I store the decorated cookies?
Keep them in an airtight container at room temperature; this helps maintain softness while preserving the fondant’s shape for up to five days.